
How to Install Rubber Gym Flooring: Complete DIY Guide
Installing rubber gym flooring transforms any space into a safe, durable workout zone. Whether you're setting up a home gym or refreshing a commercial facility, rubber flooring absorbs shock from dropped weights, reduces noise, and protects subfloors and equipment.
This step-by-step guide covers preparation through finishing touches for tiles, mats, and rolls perfect for beginners or pros.
Preparation Essentials
Start with proper planning to avoid costly mistakes. Measure your gym area precisely, adding 4-6 inches extra for trimming. Acclimate rubber materials indoors for 48-72 hours to match room temperature and humidity this prevents warping.
Clean the subfloor thoroughly: sweep away dust, vacuum debris, and mop with mild soap. For concrete, check levelness with a straightedge; fill cracks or low spots with self-leveling compound. Over carpet? Remove it or lay plywood first.
Tools needed include a utility knife, straightedge, adhesive (polyurethane-based), notched trowel, 100-lb roller, chalk line, and
Installing rubber gym flooring transforms any space into a safe, durable workout zone. Whether you're setting up a home gym or refreshing a commercial facility, rubber flooring absorbs shock from dropped weights, reduces noise, and protects subfloors and equipment.
This step-by-step guide covers preparation through finishing touches for tiles, mats, and rolls perfect for beginners or pros.
Preparation Essentials
Start with proper planning to avoid costly mistakes. Measure your gym area precisely, adding 4-6 inches extra for trimming. Acclimate rubber materials indoors for 48-72 hours to match room temperature and humidity—this prevents warping.
Clean the subfloor thoroughly: sweep away dust, vacuum debris, and mop with mild soap. For concrete, check levelness with a straightedge; fill cracks or low spots with self-leveling compound. Over carpet? Remove it or lay plywood first. Tools needed include a utility knife, straightedge, adhesive (polyurethane-based), notched trowel, 100-lb roller, chalk line, and tape measure.
Protect walls and fixtures with painter's tape. Work in a well-ventilated space, especially with glue-down methods.
Installing Interlocking Rubber Tiles
Tiles offer the easiest DIY option no glue required for most setups.
Lay the first tile in a corner, aligning edges tightly. Snap subsequent tiles together row by row, staggering seams like bricks for stability. Use a rubber mallet to tap edges flush.
Cut tiles around obstacles: trace doorways or equipment bases with paper templates, then score and snap. For walls, leave 1/4-inch expansion gaps, covered later by trim.
Roll the entire surface with a heavy roller to settle tiles. Vacuum seams to remove debris.
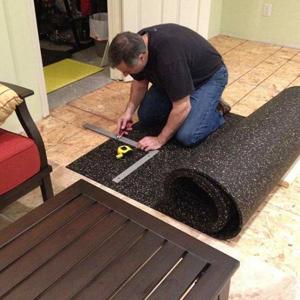
Installing Rubber Rolls or Sheets
Rolls provide seamless coverage ideal for large areas.
Unroll dry over the subfloor to check fit, overlapping seams by 1/16 inch. Mark a chalk line as your straight-edge guide from one wall.
For glue-down: Fold back half the roll, spread adhesive evenly with a 1/16-inch notched trowel. Roll into wet glue immediately, smoothing bubbles from center outward. Repeat in 10-foot sections. Use a 100-lb roller for full adhesion; avoid foot traffic for 24 hours.
Tape-down alternative for thinner rolls: Apply double-sided tape along seams, press firmly, and roll.
Trim edges with a utility knife and straightedge. Seal seams with rubber-specific caulk if needed.
Installing Rubber Mats
Mats suit portable or small zones like under racks.
Position mats where equipment sits, ensuring overlap for full coverage. For loose-lay, weigh down edges with sandbags for 24 hours.
Secure with double-sided tape or adhesive dots for high-traffic spots. Cut mats to fit using a straightedge.
Finishing Touches
Apply transition strips at doorways for smooth edges. Clean excess glue immediately with mineral spirits. Allow 24-48 hours curing before heavy use.
Test for levelness and stability. Add wall base molding for a pro finish.
Common Mistakes to Avoid
Rushing acclimation causes bubbles; uneven subfloors lead to premature wear. Overlapping tiles improperly creates trip hazards. Skipping roller pressure results in lifting edges.
FAQs
How long does installation take?
A 200 sq ft home gym takes 4-8 hours for tiles, 1-2 days for glued rolls including curing.
Do I need professional help?
DIY works for small spaces; hire pros for 500+ sq ft or uneven floors to ensure warranty validity.
What subfloors work best?
Concrete or plywood is ideal; avoid soft carpets without underlayment.
Is adhesive always required?
No—interlocking tiles and loose mats skip it; rolls often need glue for permanence.
How do I cut rubber accurately?
Use sharp utility blades and metal straightedges; score multiple times for clean breaks.
Can I install over existing tile?
Yes, if level and stable—clean thoroughly first.
What's the best thickness for deadlifts?
3/4-inch or 1-inch for heavy drops over 400 lbs.
Conclusion
Mastering rubber gym flooring installation creates a long-lasting, high-performance space tailored to your needs. Follow these steps for a professional result that withstands intense workouts while minimizing noise and injury risk. Regular sweeping and mild soap cleaning keep it pristine for years—your gym deserves this upgrade